Several months ago I switched to using a linear profile as my starting point for RAW file conversions in Camera Raw. It’s been an interesting journey. The linear profile seems to have made Camera Raw more responsive to my edits. Linear profiles work in Lightroom (Lr) the same way as in Camera Raw (Cr). I’ve shared the technique with a few other photographers. The response is usually positive. While some don’t find them all that different than the standard Adobe Raw profiles (like Adobe Standard, Adobe Color, or Adobe Landscape), others have described the experience of using linear profiles as “not fighting the sliders anymore” and “the sliders seem better calibrated.” Using a linear profile offers a subtle shift in the RAW file conversion process that’s helping me take my images further in Lr/Cr before switching over to Photoshop. Yes, I still use luminosity masks and other techniques in Photoshop, but I’m starting with a better conversion and so have less to do to finish the image. The discussion below is partly from the linear profile repository page on my website where there are free downloads of linear profiles for various cameras. The Lr/Cr-ready profiles available there will make it easy for photographers explore the use of linear profiles and determine their potential as a creative tool.
What is a linear profile?

The linear profile is simply a set of instructions that tells Lightroom, Adobe Camera Raw, or other RAW processing software how to display the data from a RAW file captured by a digital camera. The conventional profile is non-linear (not a straight line), as shown by the red curve in the attached figure. This bowed profile was selected long ago for practical reasons. Curves with this general shape convert the dull, flat output from a digital camera to a brighter displayed image that more closely resembles how we see things. The red curve in this figure is the Adobe Standard profile. Its shape is typical of commonly used profiles. Note how the red tone curve brightens essentially all pixel values while increasing shadow contrast (steeper curve) and decreasing highlight contrast (less steep curve). The resultant displayed image looks “familiar” with good brightness and contrast. Since the profile is the initial interpretation of the camera RAW data, there are valid reasons to choose one that brings the image to an “attractive” point where the adjustments in Lr/Cr can be used to refine the final result. However, a profile does NOT have to be curved. A linear (straight-line) profile, as shown by the black line in the figure, could also be used. If the profile used by the program is linear, the displayed image is typically less vibrant, but (and this is important) it also better represents the actual data in the RAW file. If the conventional profile is considered step one in the processing workflow, then the linear profile is “step zero.” The linear profile allows ALL pixel adjustments to be made entirely by the photographer, whereas, with a curved (nonlinear) profile, the first major step in developing the image is already shaped by the software and camera engineers who designed that profile. The linear profile takes a step back to offer a new level of control for interpreting digital camera data and opens new opportunities in the process
How to use a linear profile
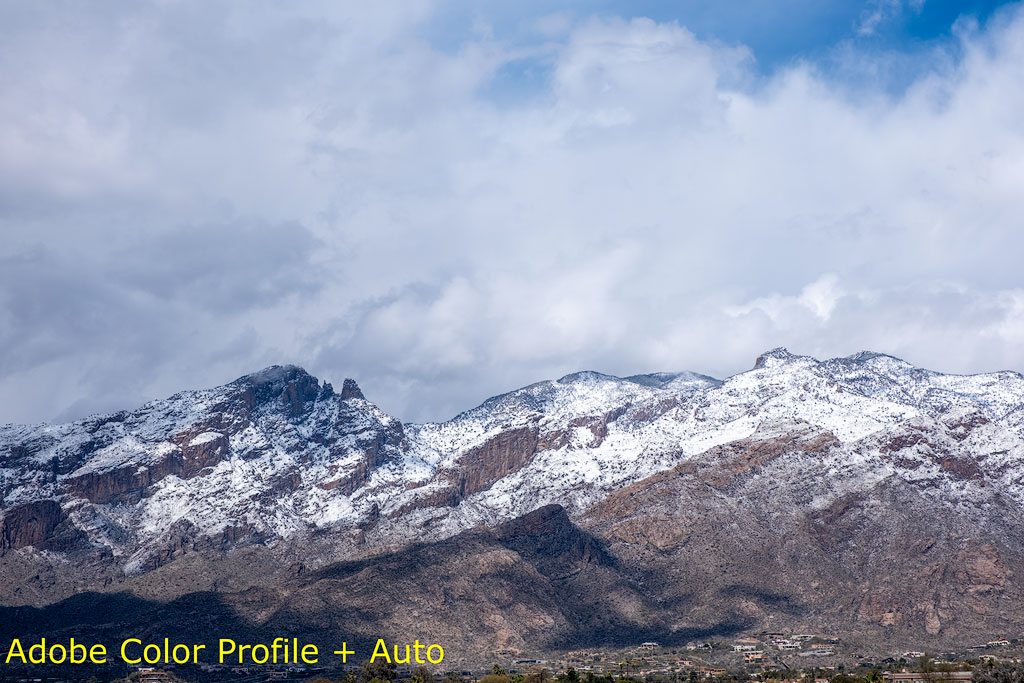
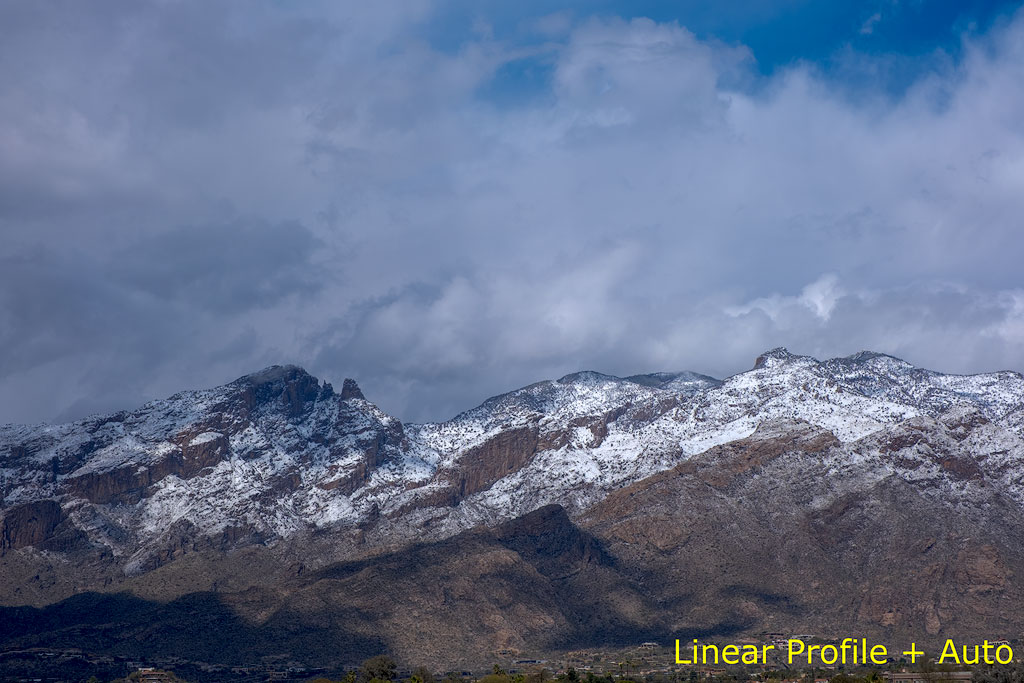
1. Click “Auto” after applying the linear profile. Installing and using linear profiles is described in this PDF. In terms of using them, my current strategy is a combination of “Auto” and manual. When the linear profile is first applied to the image, it looks darker, less saturated, and has less contrast. This is disappointing, but entirely expected. Remember, the standard Adobe Raw profiles are designed to make the image look good, so removing them and reverting to a linear profile makes the image look not-so-good anymore. However, there is an easy fix to get back a reasonably good starting point. Just click the “Auto” button in Lr/Cr. Adobe’s algorithm for the “Auto” button has gotten pretty good, and even the darker, flatter image that results from applying the linear profile is much improved after clicking it. Using “Auto” with a linear profile frequently gives better results than using it with an Adobe Raw profile. The image below shows the difference between using “Auto” with a linear profile and the Adobe Color profile. With the linear profile (on the right), the highlights are full of texture and detail, and the shadows are not overly contrasty. The Auto-processed linear profile also has richer color and better global contrast. In this case, the linear profile clearly provides a better starting point for additional adjustments. Every image is different, of course, but a linear profile combined with “Auto” is generally a good place to begin.
2. Adjust Exposure and Contrast and other sliders. After clicking “Auto,” an Exposure and Contrast adjustment will almost certainly still be necessary, but don’t stop with those adjustments. The real beauty of using a linear profile is how much more responsive the sliders in Lr/Cr are now compared to starting with one of the Adobe Raw profiles. The various adjustments perform as expected without “breaking” the image, and the sliders often have some additional leeway before reaching their extreme positions where no additional adjustments are possible. Shadows, Highlights, Whites, Blacks, Vibrance, and Saturation can all be useful in fine-tuning the image.
NOTE: An alternate approach is to skip the “Auto” adjustment and start working directly with the Lr/Cr sliders. It’s entirely possible to outperform the “Auto” algorithm, especially once you gain confidence in the way the image responds to the various sliders when starting with a linear profile.
3. Fine-tune color. Adjusting color balance is one of the things that I find especially easy to do with the linear profile. This usually involves just small adjustments with the Vibrance and Saturation sliders in the Basic tab after clicking “Auto”, but I also always visit the Color Mixer in Camera Raw (HSL/Color in Lightroom), since these sliders now work exceptionally well to control hue, saturation, and luminance of the various colors.
Advantages of linear profiles
- More flexibility in Lr/Cr since the sliders often provide additional room for adjustments.
- More predictable adjustments in Lr/Cr since the image responds better to slider movements.
- Better shadow and highlight recovery.
- Richer, but not over-saturated, colors to work with.
- Hue, saturation, and luminance adjustments work better.
- More pleasing RAW conversions.
- “Expose-to-the-right” has greater potential since applying a linear profile darkens the image.
Linear profiles are camera-specific
Each camera model requires a different linear profile. Once installed, Camera Raw/Lightroom will only display a linear profile option if there is an installed linear profile that matches the camera from which the RAW file was originally produced. Linear profiles for a variety of different camera models can be downloaded at the bottom of the linear profile repository page. If your camera is not listed, contact me to make to have it added to the repository.
Summary
I’m continuing to learn about and experiment with the linear profile for my camera. It takes a little extra effort, but I’m now at the point where I can confidently create a better RAW file conversions than I could using standard Adobe Raw profiles. There is more flexibility in the basic and color adjustments, the sliders are more predictable, and it’s easier to recover good shadow and highlight detail. Overall, the output from Camera Raw is more pleasing, and I’m able to finish the image in Photoshop faster. I hope you’ll give linear profiles a try and see what they can do for your images.
The video below by Dave Kelly reviews the basics of adding a linear profile to your workflow.


Indeed I have used linear profile as my default setting in Capture One for a long time , the highlights particularly benefit from such a starting point.
LikeLike
Yes, I’ve heard that Capture One is ahead of Adobe on this. Glad to know you’ve found it beneficial to include the linear profile in your workflow.
LikeLike
Yes, I agree with you, Benoit. I still use linear profiles in Capture one, the gain in the highlights is impressive.
LikeLike
Hi Tony, Thanks for this linear profile explanation. With your help, I have been using the linear profile for a couple weeks with much success. Prior to using it, I was starting out with one of the other profiles in LRc by setting exposure at -1.0 and contrast at -33. These are the settings that Michael Frye has been recommending to get to a zero start. I think the linear profile works just as well, maybe better. This is just a little feedback. Many thanks.
Larry
>
LikeLike
Thank you, Tony. Is the “Camera Natural” profile for a given camera essentially its linear profile?
Howard
LikeLike
Howard–Definitely NOT. Camera Neutral is nothing like the linear profile. None of the the “Adobe” profiles are like a linear profile that I’m aware of. All the Adobe Profiles apply a curve. The linear profile removes it.
LikeLike
Tony,
I read your article with great interest, but have one question. I already use my camera color calibration profile (Passport), and it appears that the linear profile would displace this in a RAW conversion using the Profile drop down menu. You mention that a linear profile is not a color profile, so would I then have to go back to guessing what my camera’s color biases are in the RAW file if I start with a linear conversion?
Best regards,
Chuck
LikeLike
If you’re using specific color calibration software with your RAW profile conversions, I don’t think linear profiles would be useful. It’s not something I’ve explored and can’t really speak to it. I see linear profiles as a creative tool and not a color-matching tool. If exact color matching is an important part of your workflow, I’d stick with whatever has proven best in your experience.
LikeLike
Thank you Tony for your post.
This is a really good way to go on for individual development of raw-pictures. I’m doing this since August 2020 (https://foto-aktiv.meine-art-zu-sehen.de/dng-profile-editor/ –> in German) to better deal with my ETTR pictures. In the meantime I’m not only use linear curves but also some N +/- 1,2,3 curves (yes I learned this during my time with large format cameras based on Ansel Adams work and adapted it to my digital Zone System).
The only problem I still have is with the monochrome profiles, where I cannot fully use the HSL sliders. But most of the things work perfectly.
All the courses of Jim Welninski were a big help for my own photographic development. And the TK-Luminance Masks I use since I started with PS.
Thank you again. I hope your post will spread this idea to a wider community.
Wilhelm
LikeLiked by 1 person
I just played around with Linear Profile and I found it to render MUCH better images on the Canon R5. LR and ACR seems to have trouble rendering Canon R5’s files and I’ve tried a few Camera Profiles already, none of them really feels satisfying, but this method seems to render a much more realistic image.
Thank you for sharing this method!
LikeLiked by 1 person
I’m glad to hear the linear profile was useful. While the usefulness may vary image to image and user to user, I find them a great way to explore new possibilities in the conversion process.
LikeLike
Thanks Tony, you are always delivering something new. . . I will indeed investigate this new way of starting an image.
LikeLike
Tony, again a great post.I now can develop my images almost from zero. Today I worked with the linear profile and I like it. I almost never used the different profiles. But this great learning moment for me. Thank you, Tony.
LikeLiked by 1 person
So, Tony, would you say that the LINEAR PROFILE (as downloaded for my Nikon D850) pretty much fulfils the same ‘zero’ start point as Adobe’s Camera Matching FLAT PROFILE? Or is the LINEAR PROFILE a more targeted version of the FLAT PROFILE?
Thanks again for all your pioneering work.
LikeLike
I doubt that the linear profile matches any other profile, including the “matching FLAT PROFILE,” though I’m not familiar with that. The linear profile essentially removes all other profiles. So it’s unlikely to match any profile that introduces a curve when interpreting the RAW file’s data.
LikeLike
Thanks for your work on this. I’m experimenting with your linear profile for Fuji GFX 50R. I haven’t yet determined if it will become part of my workflow, but one issue I noticed on the first image I applied it to is that the thumbnail preview in Bridge 2021is not the same as when I open the image in camera raw. The Bridge thumbnail is way too bright and washed out. Is this normal? Is there a way to fix this?
Thanks!
LikeLike
Try restarting Photoshop and Bridge. I noticed the same thing when I applied the linear profile without restarting Photoshop and Bridge after installing the linear profile. However, when I restarted Photoshop and Bridge, the Bridge thumbnail looked like it was supposed to look. No problems since. I think this odd looking thumbnail image is akin to having to completely restart Lightroom before the linear profile option is even available for applying to the RAW file. Restarting the apps after installing a linear profile is probably always a good idea.
LikeLike
Thanks Tony, I should have thought of that. It’s fixed, everything looks as expected. Best, Peter
LikeLike
Thank you Tony for bringing linear profiles to light – forgive the pun. It made me wonder how much overexposure of highlights is possible for images using linear profiles in Camera Raw? This will vary of course from camera model to camera model. The ability to use the full range of ‘bits’ available to an image would be wonderful. Of course DSLRs themselves superimpose a profile whilst shooting so they hide the possibilities available. Could a linear profile be created and loaded into a DSLR which would enable these possibilities – especially highlight detail – to be visible?
LikeLike
I’ve never been big on excessive ETTR (expose to the right) just in case some highlights get accidentally clipped. It depends on your lighting situation. Evenly lit scenes, like overcast skies, provide a little more latitude. It’s my understanding the the camera does use a color profile to display the image in the RAW file (sRGB and Adobe RGB are commonly available for this), though I’m not sure if an additional profile is involved or not. It seems like it might be, but I’ve not heard what it is or how it operates. Generally, at least for me, I’m most interested in the composition and histogram that I’m seeing on the camera’s LCD and there’s probably some benefit in seeing a fairly accurate representation of the scene that was captured in order to evaluate capture success. Seeing a linear-profiled image on a camera’s LCD could possibly make this capture evaluation a bit more difficult, though it would be interesting to be able to see the linear-profiled image at the point of capture and maybe adjust light to ETTR more if the linear profile indicated it were practical. However, I don’t think it’s possible to add profiles like the linear profile to your camera or whether they could even be used. But it is an interesting thought experiment.
LikeLike
Hi Tony,
Thanks for this great tool. Indeed, when I develop my raw files, I start with a (camera) flat profile.
This is a “trick” that I did learn from Dan Margoulis. He showed in a video the advantages of such an approach.
Now I have also “linear”, and I do like it!
LikeLiked by 1 person
I’ve been using in PS and like it. How to install into Lightroom?
Get Outlook for iOS ________________________________
LikeLike
Once you have installed the linear profile into Camera Raw, it is available in Lightroom also. However, you need to restart Lightroom in order for it to show up.
LikeLike
Dear Tony, Just wanted to say a big thanks for making this available, it is very generous of you!. I have downloaded the profile and think it will really help – I like doing insect images, sometimes they have very bright shiny parts or very white areas and very dark areas and I can see it will be a big help in developing those images. best wishes Jean
LikeLike
Thank you so much for these, already seeing benefits, particularly with insect photography!
LikeLike
I’m glad to hear the linear profile is useful. For some images, especially those with bright highlights, the linear profile can make quite a difference.
LikeLiked by 1 person
Hey, Tony … thanks for putting this out there. I started using a linear profile in LrC last year, after working through Jim’s course, but I was never sure if I actually got the profile right. Well, I am happy to report that I installed your version, and both it and the version I created last year appear to produce the exact same result in the raw file … I’d go as far as saying they look dead on. So, it confirms what I’ve already built, and it really does provide a more correct staring point – the LrC sliders give me so much more control. Thanks again.
LikeLike
I appreciate that feedback, Martin. I’ve confirmed with another photographer that the linear profiles match regardless of the RAW file used to create the profile. Though I can appreciate your relief to know you did it right. One thing that I’ve noticed is how applying the linear profile almost always adjusts the Temperature and Tint sliders, sometimes substantially (I know, surprising, but it’s apparently necessary to keep the image looking like whichever Adobe RAW profile was being used and makes one wonder what is going on behind the scenes with the Adobe profiles). That might be one area to check to test the matching of linear profiles produced from different sources. It sounds like you’ve been using linear profiles longer than me, and I’m glad to hear they’ve been useful to you long-term.
LikeLike
Wow, that’s interesting about the color balance sliders being adjusted – I had not noticed that. I’ll have to keep an eye on it and see where it leads. And yes, no doubt Adobe is still leaving its fingerprints all over the file, despite our best efforts. I’ve recently created a develop preset to use at the import step, which sets the profile to Linear, and resets the sharpening and color noise reduction amounts to 0 (for another Lightroom-Photolab-Photoshop workflow that I have recently come across that seems to handle noise, sharpening, and camera/lens idiosyncracies much better than Adobe). I’ll have to see if that makes any difference to the resultant imported raw. Thanks again for all the work you do to chase this stuff down.
LikeLike
Hi Tony. Chuck Hallsted had asked about a camera color calibration profile (Passport) vs a linear profile. Here’s an approach that brings the advantages of both profiles together. I’ve been using 2 different virtual copies as layers in PS. One layer is a linear profile copy and the other a camera profile layer. The camera profile layer (set to colour) is positioned above the linear layer (set to normal). This arrangement provides the best of both worlds…accurate colour (camera profile) with more natural and improved detail (linear profile). I’d be interested in your thoughts on this approach.Thanks for posting all of this information and for the generous profile downloads!
LikeLike
Rob–This is an area many people have asked about. For me, linear profiles were all about enhanced creativity, not color fidelity, which has never been a big part of my photography. However, it’s apparent from email I’ve received that there is a lot of interest in combining linear profiles with color-matching. I don’t feel qualified to recommend any specific approach that combines color calibration with linear profiles as it’s not an area I’ve explored. Maybe your comment will help others to consider possibilities in this regard.
LikeLiked by 1 person
These are absolutely amazing. It’s like exactly what I have been looking for and missing in my editing for year. After editing in LR I always had to do extensive PS work to get something I liked and now the straight LR edit is sometimes better than my old PS edit. I find that the adobe or camera profiles add a lot of what essentially looks like clarity when compared to the linear profiles and to get them to look similar you have to add +30 in some cases which is crazy. I notice it most severly when trying to save a lot of highlights and boost shadows to balance shooting sunrise into the sun for example.
Another side benefit–I am finding when I use the respective linear profiles on different cameras in the same scene it essentially gets them to damn near 100% match which I could almost never get perfect before. Really blows away the idea that x camera has much better color than y. It seems that the biggest culprit was how adobe has slightly different profiles for different cameras.
LikeLiked by 1 person
Nathaniel–Thanks for the feedback. I too find myself routinely adding Texture and Clarity to my image when using the linear profile for my camera. Texture +30 and Clarity +15. However, I also don’t add any sharpening in Camera Raw, which is part of the reason I add texture. So Clarity is definitely something to experiment with when working with linear profiles, though it’s possible different cameras will require different amounts.
Very interesting that images from different cameras match much better when the linear profile is applied to each. I’ve not experimented with this at all and don’t know how universal it is. Are your cameras different brands? It’s certainly an interesting observation.
LikeLiked by 2 people
Yes, I had a few comparison files taken at the same time between z7 and 5div as well as some with d850 and in the past I worked to try and match them and it was always near impossible. It seems not just contrast wise but adobe profiles affect the color balance in different ways. For example, normally when trying to match I would have to play around with shadow tint in the calibration section as they differed quite a bit. I also tried with dpreviews studio scene on a few cameras and if you use a linear profile with the same edit settings and use the white balance dropper on the same spot you get a closer match than I’ve seen before. Not super useful or important in practice but since I have heard many people talk of having issues getting used to new files when they get a new camera it might be a way to not have to worry about that
LikeLike
I love this. I have been using a very similar technique for a couple of years. I don’t know but have you ever heard of Guy Gowan and his actions for Photoshop? Anyway I strongly believe you get a much better result/image when you start off with a flat, almost ugly image, and better shadows and highlight details.
LikeLiked by 1 person
Thanks, Tony. Have used it in Capture One but never really understood it. Good explanation. Have it in Lr as well now, thanks to you. Some shots that I thought had overexposed highlights before are now useable. TK8 convert!
LikeLike
I think linear profiles are another creative tool. Sometimes they can be very helpful in realizing the potential in an image.
LikeLike
How did you create the linear profile for each camera?
LikeLike
The “Additional information” links on the linear profile repository website covers all this: https://goodlight.us/linear-profiles.html
LikeLike
Adobe should have a Linear profile as part of their standard set!
Thank you for doinig this:)
LikeLike
Hi Tony. Great article. I have a few images that this really worked well on. I was wondering if there is a Linear profile for DNG files. I use DxO’s PurRaw to remove noise from my Canon .CR3 files, these can save to a DNG format. But when I open the DNG in ACR, there is no Linear profile available…I also did not see a Linear profile available for DNG on your site.
LikeLike
Linear profiles can only be applied to the original RAW file or capture DNG. They’re based, I think, on Adobe’s demosaicing algorithm for the sensor. A round trip to DxO PurRaw would obfuscate the original sensor data and thus make applying a linear profile no longer possible.
LikeLike
Just to expand on Tony’s response, the DNG files PureRaw generates are demosaiced RGB files. (This is why they’re so much larger than the originals, BTW.) Yet they’re still in a linear space like a digital image sensor. So they’re a hybrid between the traditional Bayer-type camera raw files and the kind of RGB files that are tagged with an output color profile like sRGB or Adobe RGB. (The DNG spec calls these Linear RGB files). This is probably the same way Foveon-based RAW files are stored, so I would expect RAW developers to work with the PureRaw files similar to how they work with Foveon files. How that works is a mystery to me… I guess they just skip the demosaicing part of RAW processing and pick up from there.
LikeLike
The linear profile I downloaded for the D850 is a DNG camera profile with a tone curve defined by two points: (0,0) and (1,1). A DCP includes many other development parameters. I suspect the different ACR profiles differ more than in just their tone curve. It would be nice if ACR included an option to just disable the camera profile tone curve, like you can in Affinity Photo, for example. Then you could still apply any camera profile, just without its tone curve.
Incidentally, Adobe’s open source DNG developer applies several additional, non-trivial tone transformations before and after application of the DCP tone curve. These likely account for the nonlinearities in tone adjustments some have observed, even with these “linear” profiles. Some of these transformations change depending on the exposure of the image and the exposure adjustment in development. Some of them are based on the gamma curve of the output/processing color profile. These are not part of a DNG camera profile, and I don’t see anything in ACR to suggest that they can be modified/disabled.
Unlike the DNG source code, ACR is closed source. Just because the DNG developer works one way doesn’t mean ACR does as well. However, my gut tells me that ACR mimics the behavior of the DNG developer to a large degree, simply because DNG is an open standard and ACR uses a DNG camera profile as part of its development process. ACR provides many more options and adjustments than the open source DNG developer.
LikeLike
As I understand it, the linear profiles produced in the DNG profile editor are based on the Adobe Standard profile, so whatever Adobe does to create the Adobe Standard profile for a particular camera model (other than adjusting the tone curve) will probably get transferred to the linear profile. However, I guess it would make sense that the .dcp file for this linear profile would only contain two points since creating it involves removing Adobe’s tone curve. There would only be two points necessary when that tone curve is removed. Regardless of whether the linear profiles produced by the DNG Profile Editor are PERFECTLY linear or not, they are significantly more linear than other profiles available in ACR/Lr, and, as such, provide a unique starting point (and potential advantages) for developing images. I agree that it would be ideal for Adobe to give us a “linear” option of some kind in ACR/Lr, but until then, I enjoy experimenting with the linear profiles available form the DNG Profile Editor.
LikeLike